OmniGuides brings the precision and workflow of graphic design software (like Photoshop) directly into the Unity Editor. It provides an intuitive system of infinite rulers, guides, and grids to help you align objects, layout UI, and structure level geometry with pixel-perfect accuracy. The tool is compatible with Unity 2022.3.22f1+.
Installation
- Import the OmniGuides folder into your Unity Project (anywhere inside
Assets/). - The tool works out-of-the-box. It will automatically create a default profile data file if one does not exist.
- Look for the [OG] button in your Scene View toolbar (usually top-right or top-left) to toggle the system.
Quick Start
- Enable 2D Mode: In the Scene View, click the 2D button. You will see the Ruler Bars appear on the Top and Left edges of the view.
- Create a Guide: Click anywhere inside the Ruler bars and drag into the scene. A cyan guide line will follow your mouse.
- Snap Guide to Grid: By default, guides snap to Unity’s native grid settings.
- Free Move: Hold Ctrl (Windows) or Cmd (Mac) while dragging to disable snapping and move smoothly.
- Snap Object to Guide: Hold Ctrl/Cmd+Alt while dragging a game object to snap to the nearest guide.
- Delete a Guide: Drag any guide back onto the ruler it came from to delete it, or remove it from the Control Panel.
Features Overview
Rulers & Guides
- Infinite Lines: Guides extend infinitely across your world (up to the camera’s far clip plane), perfect for lining up distant objects.
- 3-Axis Positioning: Position guides anywhere in 3D space with X, Y, and Z coordinates.
- Individual Visibility: Toggle guide lines and labels independently.
- Dual Display Systems: Switch instantly between standard Unity World Units and Pixel-based measurements.
- Custom PPU: Define your own Pixels Per Unit (PPU) setting to match your project’s specific asset standards or UI Canvas scaling.
- Smart Conversion: Guides are always stored in World Units but are displayed and edited in your preferred format. This allows you to work in Pixels for UI layout without breaking world-space consistency.
2D & 3D Support
- 2D Mode: Rulers are visible; labels and offsets are active.
- 3D Mode: Guides render as “Laser Walls” (X/Y) or “Floor Grids” (Z) in world space. Text labels are automatically hidden to prevent visual clutter.
- Smart Fading: In 3D view, lines fade out in the distance to prevent visual noise.
Groups & Layers
- Organize guides into collapsible Groups (e.g., “Main Floor”, “UI HUD”).
- Toggle visibility for entire groups instantly.
- Assign unique colors to groups for easy identification.
- Groups show total guide count for quick reference.
Robust Profile System
- Save your layouts as ScriptableObjects.
- Smart Detection: The tool automatically finds your active profile even if you move files or rename folders.
- Manual Loading: Browse for and load any profile in your project.
- Hot-swap profiles instantly via the Control Panel dropdown.
- Share profiles with team members as
.assetfiles.
Labels & Dimensions (2D Only)
- Add text labels to any guide (e.g., “Jump Height”, “Center Line”).
- Customize font size and positional offsets.
- Independent visibility control for labels.
- Offsets: Slide text along the line to prevent overlap when multiple guides are close together.
Grid Generator
- Rapidly create precise grids with directional control.
- Global center point system for organized layouts.
- Generate grids for all three axes (X, Y, Z).
- Combine multiple grid types into single groups.
Bounds-Based Generator
- Automatically create guides from GameObject bounds.
- Perfect for quick alignment and spatial reference.
- Support for Renderers, Colliders, and RectTransforms.
- Generates labeled guides for edges and center points.
Controls & Shortcuts
Toggle tool
- Click [OG] button in Scene View overlay
- OR press Ctrl+G (Cmd+G on Mac)
Open control panel
- Click the Gear Icon next to the [OG] button
- OR press Ctrl+Alt+G (Cmd+Alt+G on Mac)
- OR menu: Tools › itsMakingThings › OmniGuides › Open Control Panel
Create guide
- Click & Drag from the Top or Left Ruler bars
- OR use Grid Generator for bulk creation
- OR use Bounds Generator for object-based guides
Move guide
- Click & Drag an existing line
- OR edit Pos X, Pos Y, Pos Z fields in the Control Panel
- Hold Ctrl (or Cmd) while dragging to disable snap
Delete guide
- Drag the line back onto the Ruler bar
- OR click [-] button in Control Panel
- OR delete entire group with [X] button
Snap objects to guides
- Hold Ctrl/Cmd+Alt while dragging to enable magnetic snapping to any guide.
- Works with Edges or Center of object bounds, including transparent areas.
- Smart Release: Once locked, move the mouse firmly to break the magnetic snap.
Visibility controls
- Group visibility: Checkbox in group header
- Guide visibility: Left eye icon (shows/hides guide line)
- Label visibility: Right eye icon (shows/hides label text)
- Hide all guides: Click [OG] button
Quick unit switching
- Right-Click anywhere on the Top or Left Ruler bars to open the Context Menu.
- Select Display: Pixels or Display: Unity Units to toggle modes instantly without opening the Control Panel.
The Control Panel
Access via Tools › itsMakingThings › OmniGuides › Open Control Panel, or click the Gear Icon in the Scene View overlay.
Active Profile
- Select from existing profiles via dropdown menu.
- Click [+] to browse for any profile in your project.
- Click “Ping” to locate the active profile asset in your project.
- Create new profiles on demand.
Global Settings
- Enable Guides in Scene: Master toggle for all guides in Scene View.
- Snap Objects To Guides: Master toggle for Game Object snapping.
- Global Opacity: Slider to adjust transparency of all guides (0-100%).
- Ruler Display Mode
- Unity: Rulers and inspector fields display standard Unity World Space coordinates (e.g., 5.5, 10.2).
- Pixels: Rulers and inspector fields convert positions into pixel values based on the PPU setting (e.g., 550px, 1020px). This is ideal for UI layout and 2D pixel-art games.
- Pixels Per Unit (PPU): (Visible only in Pixels mode) Defines how many pixels equal one Unity world unit. Default: 100 (Standard for Unity Sprites and UI). Ensure this matches your project’s import settings or Canvas Reference Pixels Per Unit for accurate measurements.
Groups List
Each group displays:
- Active indicator (radio button)
- Visibility toggle
- Collapsible foldout with group name and total guide count
- Color picker
- Delete button [X]
When expanded, groups show:
- Editable group name field
- Verticals (X): Walls or vertical separators
- Horizontals (Y): Floors, ceilings, or horizontal UI lines
- Depth (Z): Floor grid lines running into the distance
Guide Properties
For each guide:
- Delete button [-]
- Position fields based on guide type:
- Vertical: Pos X, Pos Z
- Horizontal: Pos Y, Pos Z
- Depth: Pos X, Pos Y
- Color picker (
Color.clearuses group color) - Guide visibility toggle (left eye icon)
- Label text field
- Label Size
- Label Offset (Vertical and Horizontal only)
- Label visibility toggle (right eye icon)
Add New Group
Click the [+ Add New Group] button to create a new group with auto-assigned color from the palette.
Profile Management
What are profiles?
Profiles are ScriptableObject assets that store all your guide layouts. They contain all groups, guides, and settings.
Switching profiles
Click the profile dropdown in the Control Panel toolbar to see all available profiles. Select one to switch instantly.
Manual profile loading
- Click the [+] button next to the profile dropdown
- OR select “Add Existing Profile…” from the dropdown menu
- Browse to any
OmniGuidesData.assetfile in your project - The tool automatically loads it and fixes any name mismatches
Creating new profiles
- Click the profile dropdown
- Select “Create New Profile…”
- Choose a location and name
- The new profile becomes active immediately
Sharing profiles
Workflow for team collaboration:
- Locate your profile asset in the Project window.
- Share the
.assetfile with team members. - Team members place it anywhere in the Assets folder.
- Click [+] button and browse to the profile.
- Profile loads and is ready to use.
Smart profile detection
- Profiles are cached by GUID for instant loading.
- If cache is invalid, searches project automatically (once at startup).
- Optimized for large projects. No performance impact.
Grid Generator
The Grid Generator creates precise grids with full directional control and a global center point system. Perfect for level design, UI layouts, and spatial organization.
Note on Units: The Grid Generator inputs (Gap, Offset, Center) automatically respect your current Ruler Display Mode. If you are in Pixels mode, a “Gap” of 100 creates a gap of 100 pixels (which equals 1.0 World Unit at default PPU). If you are in Unity mode, a “Gap” of 100 creates a gap of 100 World Units.
Global Center Point
Set the center of your grid system with X, Y, Z coordinates. All grids build from this center point, making it easy to create symmetrical or organized layouts.
Vertical Guides (X-axis)
Creates guides along the X axis (vertical lines in 2D view).
Parameters:
- Count: Number of guides to create (1-50)
- Gap: Spacing between guides
- X-Offset: Additional offset applied to all guides (additive)
Direction:
- X-: Guides from center going left (negative X direction)
- Center: Guides spread equally in both directions from center
- X+: Guides from center going right (positive X direction)
Horizontal Guides (Y-axis)
Creates guides along the Y axis (horizontal lines in 2D view).
Parameters:
- Count: Number of guides to create (1-50)
- Gap: Spacing between guides
- Y-Offset: Additional offset applied to all guides (additive)
Direction:
- Y-: Guides from center going down (negative Y direction)
- Center: Guides spread equally in both directions from center
- Y+: Guides from center going up (positive Y direction)
Depth Guides (Z-axis)
Creates guides along the Z axis (depth lines in 3D view).
Parameters:
- Count: Number of guides to create (1-50)
- Gap: Spacing between guides
- X-Offset: Offset along X axis
- Y-Offset: Offset along Y axis
Direction: X-, Y-, Center, X+, Y+
Combined Generation Buttons
- Generate X and Y Guides: Creates both Vertical and Horizontal guides in one group; perfect for 2D grids.
- Generate X, Y, and Z Guides: Creates all three guide types in one group; creates a complete 3D framework.
Example: creating a 3D grid
- Set Grid Center Point:
(0, 0, 0) - Vertical Guides. Count: 10, Gap: 100, Direction: Center
- Horizontal Guides. Count: 10, Gap: 100, Direction: Center
- Depth Guides. Count: 10, Gap: 100, Direction: Center
- Click “Generate X, Y, and Z Guides”
Result: A complete 100-guide 3D grid framework centered at world origin.
Tips
- Use Center direction for symmetrical layouts.
- Use directional buttons (X+/X-/Y+/Y-) for one-sided expansions.
- Start with larger gaps and refine later if needed.
- Set Grid Center Point to your scene’s focal point or origin.
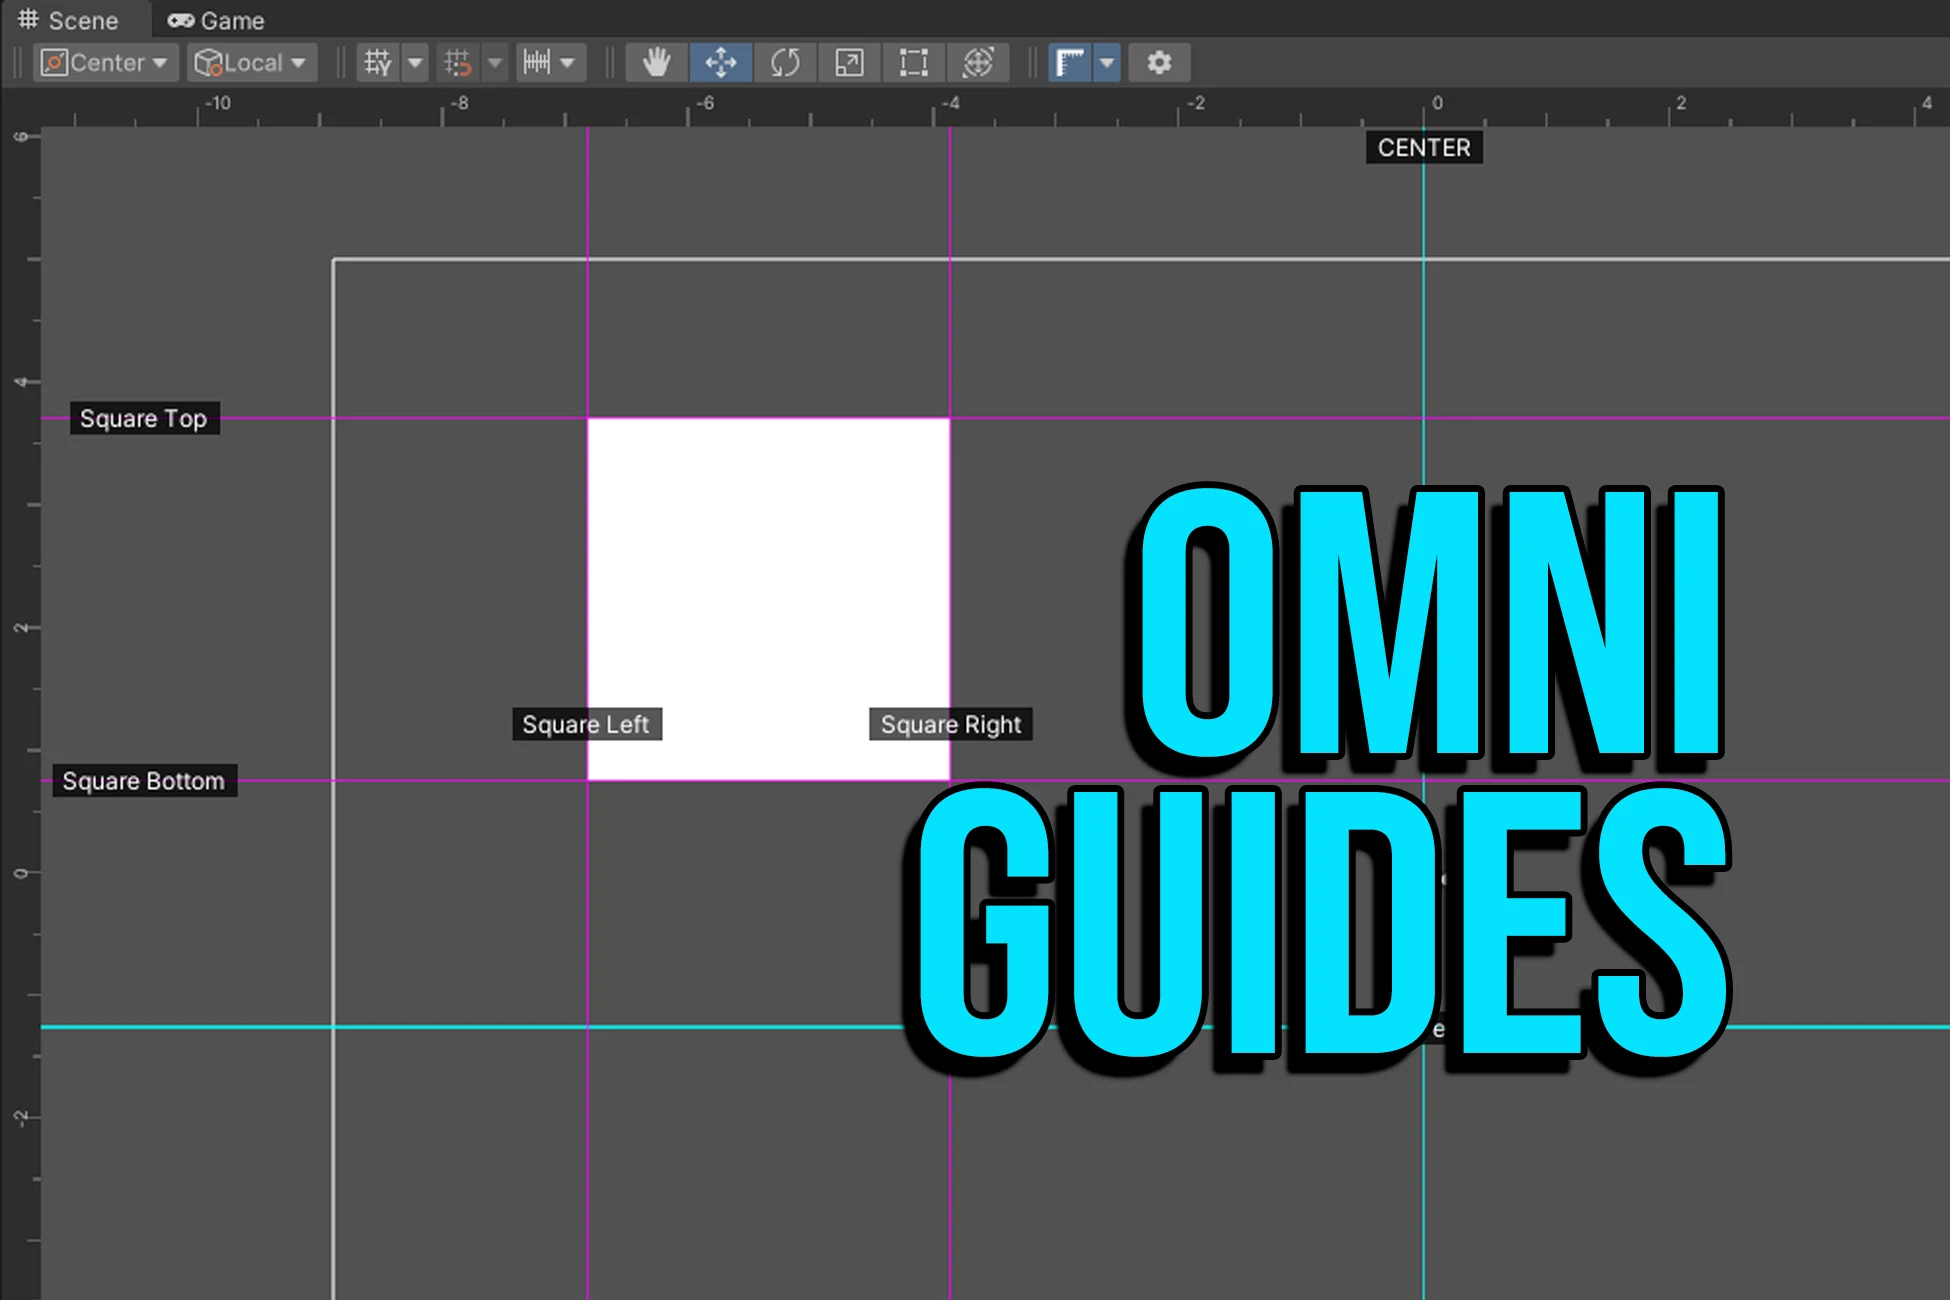
Bounds-Based Generator
Automatically create guides from GameObject bounds. Ideal for quick alignment, spatial reference, and establishing layout boundaries.
How to use
- Assign a GameObject from the scene (drag from Hierarchy), OR click “Use Selected” to use the currently selected object.
- Choose which axes to generate guides for.
- Optional: Enable “Prefer RectTransform” for UI elements.
- Click “Generate Guides From Bounds”.
Options
X (Vertical): Creates vertical guides at the Left and Right edges of the object’s bounds.
Y (Horizontal): Creates horizontal guides at the Top and Bottom edges of the object’s bounds.
Z (Depth): When enabled, duplicates X and Y guides at both Front and Back faces, creating a complete 3D bounding box of guides.
Results in labels like:
ObjectName Left FrontObjectName Right BackObjectName Top Front- etc.
Center-Point: Creates three guides (X, Y, and Z) that pass through the exact center of the object’s bounds. Perfect for finding center points and creating symmetrical alignments.
Results in labels like:
ObjectName Center XObjectName Center YObjectName Center Z
Prefer RectTransform
When enabled, the tool uses RectTransform bounds instead of Renderer or Collider bounds. Essential for UI elements where you want guides based on the UI rect rather than any attached components.
Label format
All generated guides include the object’s name as a prefix:
Player Left,Player Right,Player Center XUI_Panel Top,SafeZone Bottom
This makes it easy to identify which object the guides came from, especially when you have bounds from multiple objects.
Example uses
- Create reference guides around a character model for alignment.
- Mark important level boundaries (safe zones, spawn areas).
- Define UI element edges for consistent spacing.
- Establish margins and padding for layouts.
- Quick spatial reference for building interiors.
Best Practices
Profile organization
- Create separate profiles for different scenes/layouts.
- Use descriptive names: “Level01_Grid”, “UI_MainMenu”, “CharacterRig”.
- Share profiles with team members for consistency.
- Keep a “Template” profile for common layouts.
Group management
- Collapse unused groups to reduce UI clutter.
- Use color coding for different layers or purposes.
- Name groups descriptively: “100px Grid”, “Character Bounds”, “Safe Zone”.
- Keep your active working group expanded for quick access.
Grid generator workflow
- Set Grid Center Point to match your scene’s focal point.
- Use Center direction for symmetrical layouts.
- Use directional buttons for one-sided expansions.
- Start with larger gaps, refine spacing as needed.
- Generate X and Y together for instant 2D grids.
Bounds generator workflow
- Use “Center-Point” option for symmetry reference guides.
- Enable all axes for complete 3D spatial reference.
- “Prefer RectTransform” is essential for UI elements.
- Object name prefixes help identify guide sources.
- Edit generated guides afterwards to customize as needed.
Label management
- Toggle label visibility to reduce clutter without deleting guides.
- Customize label sizes to create visual hierarchy.
- Use label offsets to prevent overlapping text on close guides.
- Leave labels empty if you only need the guide line.
- In 2D mode, labels provide valuable context.
- Labels auto-hide in 3D mode to prevent visual clutter.
Performance tips
- Limit total guides to ~200 for optimal performance.
- Collapsed groups still function. They just take less UI space.
- Profile search only happens once at startup. No ongoing performance cost.
- Delete unused guides and groups to keep files lean.
Workflow tips
- Switch between 2D and 3D modes based on task.
- Use keyboard shortcuts (Ctrl+G) for quick toggling.
- Hold Ctrl/Cmd while dragging for precise, unsnapped positioning.
- Create guides from rulers for manual placement.
- Use generators for bulk grid creation.
- Combine manual and generated guides for best results.
FAQ
Why don’t I see labels in 3D view?
Text labels are automatically disabled in 3D mode to prevent floating artifacts and visual clutter. Switch to 2D Mode to edit labels and offsets.
Why do the ruler numbers not match my object’s position?
OmniGuides displays World Space coordinates. If your object is a child of another transform, its Inspector shows Local Space. The ruler shows the absolute position of where the object is in the world.
Can I use this for UI Canvas layout?
Yes. It is highly recommended for UI work. Ensure your Scene View is in 2D mode for the best experience. Use the Bounds Generator with “Prefer RectTransform” enabled for UI elements.
How do I share my layout with team members?
Share the profile .asset file. Team members can place it anywhere in their Assets folder, then click the [+] button to browse and load it. The tool automatically handles name mismatches.
What’s the difference between guide visibility and label visibility?
Guide visibility toggles the line itself, while label visibility only toggles the text. This lets you keep guides visible without cluttering the view with labels.
Can I position guides in 3D space?
Yes. All guides support full 3D positioning with Pos X, Pos Y, and Pos Z fields. This allows precise placement anywhere in your scene.
How many guides can I create?
The tool supports hundreds of guides, but for optimal performance, we recommend keeping the total under 200. Use groups and visibility toggles to manage large numbers of guides.
What’s the difference between the Grid Generator and Bounds Generator?
Grid Generator creates evenly-spaced grids based on count and gap settings. Perfect for uniform layouts. Bounds Generator creates guides based on actual GameObject dimensions. Perfect for alignment reference.
Can I edit guides after they’re generated?
Yes. All generated guides can be edited just like manually created guides. Adjust positions, colors, labels, visibility, etc.
Keyboard Shortcuts Quick Reference
| Shortcut | Action |
|---|---|
| Ctrl/Cmd+Alt (hold) | Enable Game Object snapping while dragging |
| Ctrl/Cmd+G | Toggle guides on/off |
| Ctrl/Cmd+Alt+G | Open Control Panel |
| Ctrl/Cmd (hold) | Disable snapping while dragging |
| Drag to Ruler | Delete guide |
| Click & Drag from Ruler | Create guide |
| Click & Drag guide line | Move guide |
Support & Contact
For bugs, feature requests, or questions, please contact: itsmakingthings@gmail.com.