Overview
Import Suite lets you define import templates that describe exactly how Unity should import each type of asset — textures, meshes, audio, and sprites. You then apply a template to a folder (or a single asset) in one click, and Import Suite sets the correct TextureImporter, ModelImporter, or AudioImporter settings for every file automatically.
Templates contain one or more modules (one per asset type). Each module has one or more rules. Rules use filename suffixes, prefixes, folder paths, and file extensions to decide which settings to apply to each file.
What Import Suite does NOT do
- It does not modify the actual asset content — only the importer settings stored in the
.metafile. - It does not upload or transmit any data outside your project.
- It does not run automatically unless you turn on Auto-Apply on Import in Settings.
Quick Start
- Open Import Suite — Go to Tools › itsMakingThings › Import Suite › Open ImportSuite. The tool opens as a dockable editor window.
- Generate the default templates — If no templates appear in the dropdown, go to Tools › itsMakingThings › Import Suite › Regenerate Default Profiles. This creates a set of ready-to-use templates for URP, HDRP, and Built-in RP, across three quality tiers (High / General / Low). The same menu item refreshes the bundled profiles after a tool update — it deletes and recreates every isBuiltIn template; user-created profiles are untouched.
- Choose a template — On the Apply tab, select a template from the dropdown that matches your render pipeline and target platform.
- Set a target — Drag a folder from the Project window into the Target field, or drag a single asset to process just that file.
- Apply — Click Apply Import Settings. Import Suite scans the target, matches each asset to the best rule, and reimports any that need changes.
Tip — name your assets first. If your textures don’t use a consistent suffix convention yet, visit the Rename tab first to batch-add suffixes like
_N,_D, or_ORM. That lets the template rules identify each texture type automatically.
Apply Tab
The Apply tab is where you run Import Suite against your assets. It has three sections: Template, Scope, and Asset Type Filter.
Template
Select which template to apply. Default templates are grouped by render pipeline in the dropdown (URP / HDRP / Standard RP). User-created templates appear below them with no prefix.
Scope
Two modes are available:
- Process Selected Assets Only — only assets currently highlighted in the Project window are processed. Useful for testing a template on one or two files before running it on a whole folder.
- Target folder or asset — drag any folder to process all assets inside it. Drag a single asset to process just that file. Enable Include Subfolders to recurse into nested folders.
Asset Type Filter
Each module in the selected template appears as a checkbox here. Uncheck a type to skip those assets in the current run without modifying the template itself. For example, uncheck Meshes to apply only texture settings from a template that includes both.
Results, Unprocessed Assets, and Undo
After Apply finishes, a summary bar shows Processed / Skipped / Errors. If any assets were skipped because no rule matched them, a View N unprocessed assets button appears. Click it to open the Unprocessed Assets window.
An Undo button also appears directly below the summary whenever at least one asset was processed. Clicking it restores the .meta file content for every processed asset to the state it was in before Apply ran, then triggers a reimport. See Undo History for details and limitations.
Apply Import Settings button
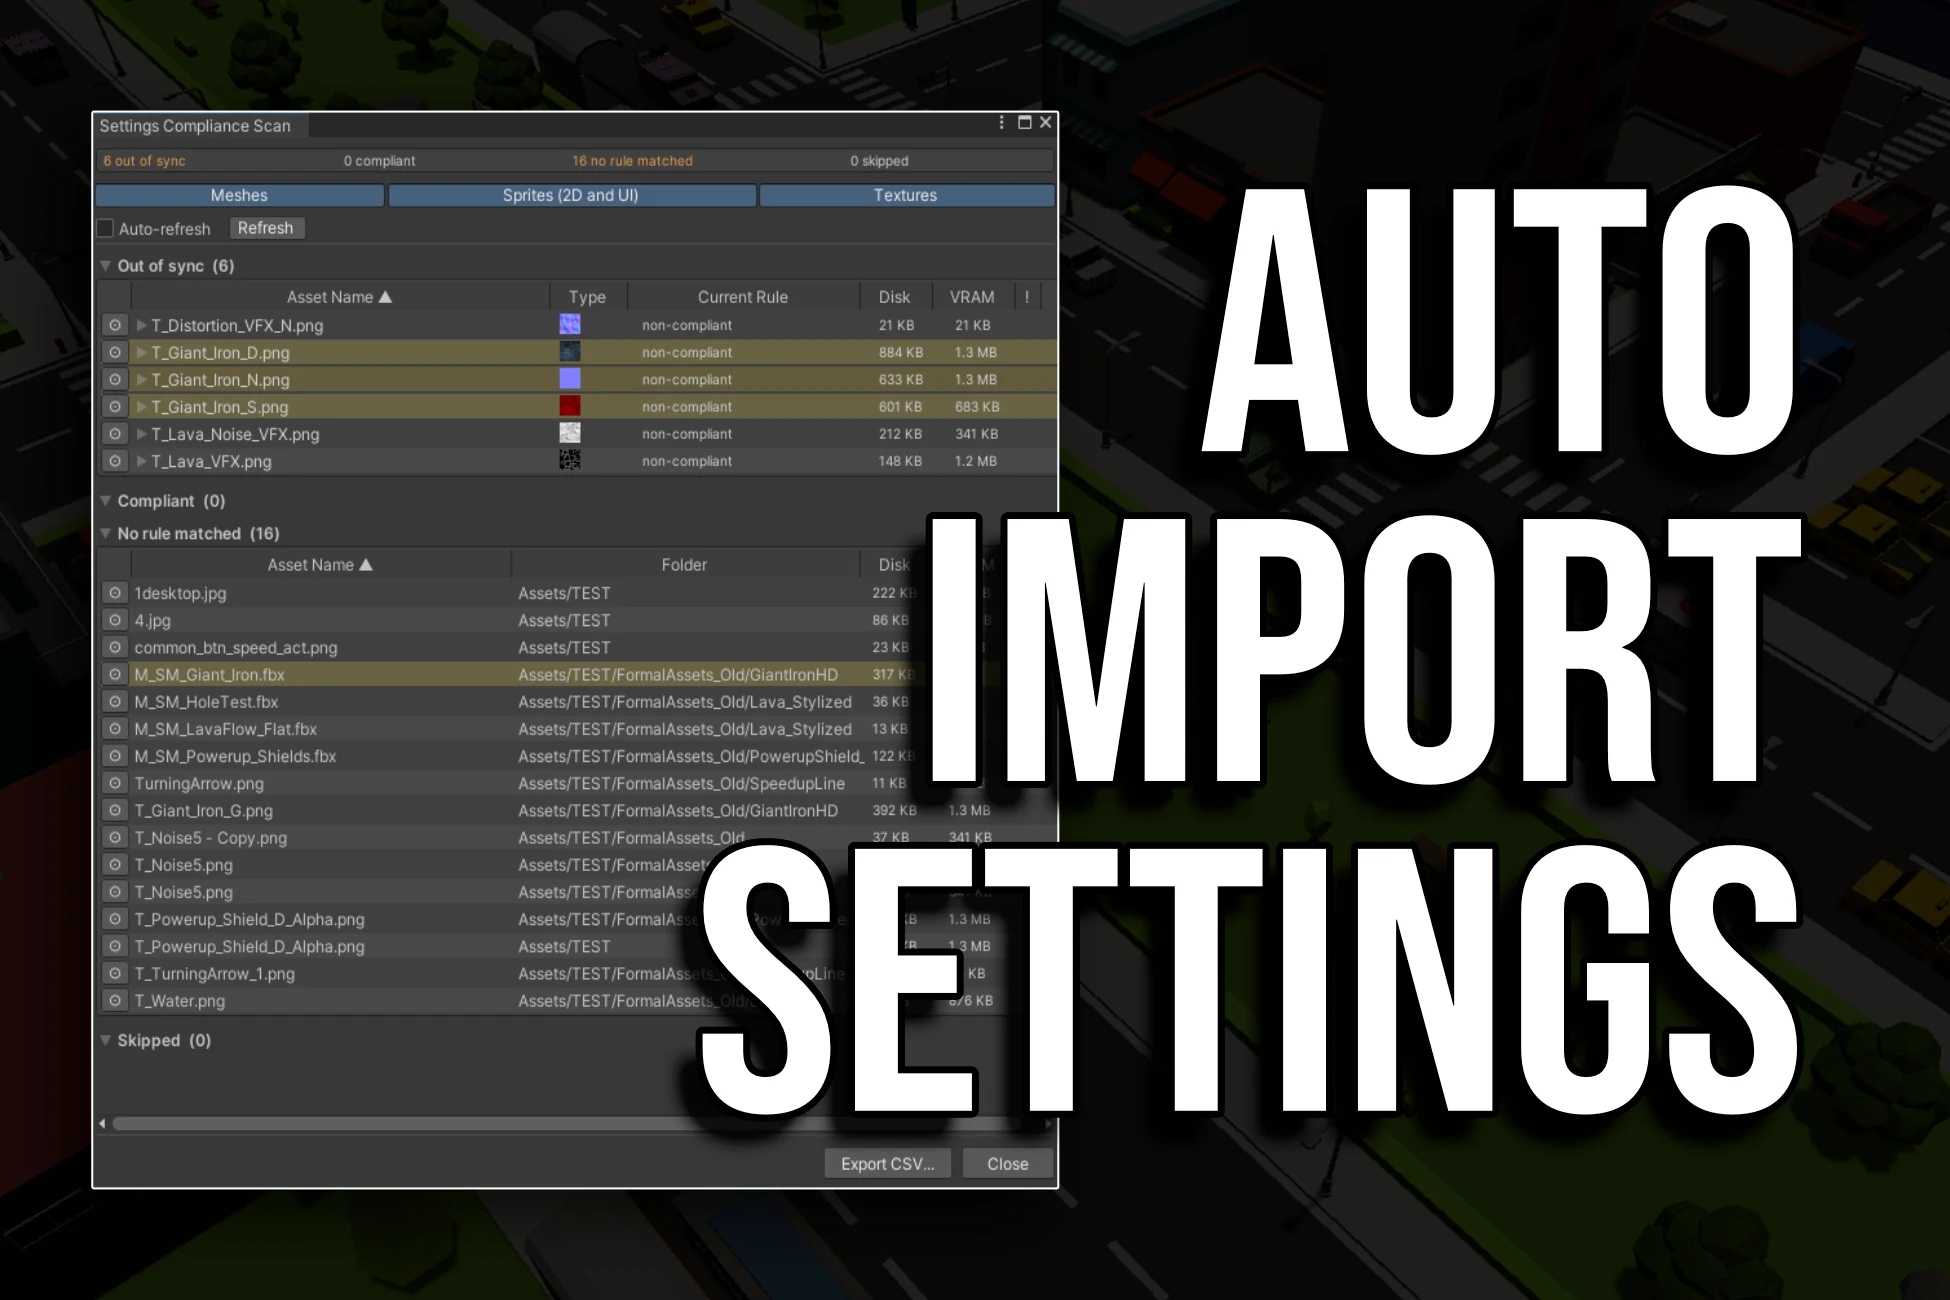
Clicking Apply Import Settings opens the Apply Import Settings window, which combines preview, compliance scan, and apply into a single view. Inside that window you can review every asset grouped by outcome, see settings compliance for matched rules, rename inline, exclude individual assets, run an Apply or Apply-Compression-Only batch, and Undo from the same place — all without leaving Import Suite.
Apply Import Settings Window
The Apply Import Settings button on the Apply tab opens a single window that combines what used to be three separate tools — preview, compliance scan, and apply. Every asset in scope is listed and grouped by outcome.
Outcome groups
| Group | What it means |
|---|---|
| Will be applied | A module and a rule both matched this asset, and the current importer settings differ from the rule. Each row has a checkbox (checked by default), an editable name field, and the Status column shows ✗ Out of sync (N). Hover the status text for the field-by-field diff popup. |
| Compliant | A rule matched the asset and its current settings already match. The Status column shows ✓ Compliant. The group is collapsed by default and rows are unchecked — they will be skipped on Apply unless you tick them explicitly. Useful for forcing a reimport on an already-compliant asset. |
| No rule matched | A module can handle this asset type, but no rule scored high enough — and the module’s catch-all is either disabled or absent. Rows show the same columns as Will be applied, but with — in the Target Rule and Status columns. Renaming a row to satisfy a rule will reclassify it on the next refresh. |
| Skipped | Filtered, excluded, unsupported, or no-importer assets. The group is collapsed by default. Each row shows a Reason column with one of: Filter, Excluded, No Module, Compliant, No Importer, Unsupported. |
Row columns
- Checkbox — include or exclude this row from the Apply batch.
- Ping — highlights the asset in the Project window.
- Asset Name — editable text field. Type a new name, then click Apply in the Rename column to rename on disk; click Reset to discard the unsaved edit. Both buttons are disabled until the text actually differs from disk.
- Path — the asset’s directory, ellipsis-clipped if long; full path appears in the tooltip.
- Type — Unity asset icon. Hover to open a floating asset preview popup with a full thumbnail and filename label.
- Target Rule — the matched rule name, or — if nothing matched.
- Status — settings compliance badge. Hover an out-of-sync status for the field-by-field diff popup.
- VRAM — one column per build platform (PC, Android, iOS, WebGL), estimated GPU memory cost under the matched rule. Coloured green when the rule would reduce VRAM, red when it would increase it. No texture load required — estimated from importer metadata only.
- ! — non-multiple-of-4 warning for textures whose source dimensions are not divisible by 4 (BCn block-compression artefact risk). Hover for the explanation.
Status badge — settings compliance
The Status column tells you at a glance whether each row’s importer settings already match the matched rule:
- ✓ Compliant (green) — current settings already match the rule.
- ✗ Out of sync (N) (orange) — N field(s) differ. Hover the text for the diff popup showing every field as Field / Current → Target.
- — — no rule matched, so there is nothing to compare.
Footer actions
The footer has three action buttons before Apply, plus a post-apply state:
- Apply Compression Only (N) — applies only compression-related fields (texture platform overrides, mesh compression, audio loadType / compressionFormat / quality / sampleRate) to the checked rows. Other settings are left untouched. Useful for iterating on compression without disturbing custom configurations.
- Cancel — closes the window without applying anything.
- Confirm Apply (N) — applies all settings to the checked rows.
After Apply runs, the window stays open and the footer transitions to a result line plus an Undo button and a Close button.
Filter bar and exclusion list
The filter bar above the asset list lets you toggle which module types are visible (Textures / Meshes / Audio / Sprites) and add include/exclude name filters. There’s also a collapsible Exclusion List panel showing every asset on the project-level exclusion list with a Remove button per row. With Auto-update enabled, unchecking an asset in Will be applied adds it to the exclusion list (and re-checking removes it).
Auto-refresh
An Auto-refresh toggle re-scans the scope whenever assets are imported or the project changes, even when the window doesn’t have focus — so changes made in the Apply tab or to assets on disk are reflected in real time. A Refresh button is available for a manual one-shot rescan when auto-refresh is off.
Row tinting
If File Size Warnings thresholds are configured in the Settings tab, any row whose source file on disk exceeds the threshold is tinted with a subtle orange overlay. Thresholds apply to the raw file, not the build-time compressed size.
Fields checked per module type
- Textures — Texture Type (when override is on), sRGB, Alpha Source, Alpha Transparent, Mip Maps, Mip Filter, Wrap Mode, Filter Mode, Aniso Level, Read/Write, NPOT Scale, Streaming Mips, plus per-platform Max Size and Format for each platform override defined in the rule.
- Meshes — every scene, geometry, normal, rig, animation, and material setting the rule writes; differs from texture diffs only in scope.
- Audio — Force To Mono, Load In Background, Ambisonic, Load Type, Compression Format, Quality, Sample Rate.
- Sprites — Sprite Mode, Pixels Per Unit, Mip Maps, Filter Mode, Wrap Mode, Compression, Mesh Type, Extrude Edges.
Typical workflow. Open the window on a folder you haven’t processed before. Sort by Status to find out-of-sync assets, hover to see what would change, uncheck anything you want to skip, and click Confirm Apply. The Compliant group stays collapsed by default so the focus stays on assets that need attention.
Profiles Tab
Templates are ScriptableObject assets stored in your project. The Profiles tab lets you create, duplicate, export, import, and preview them.
Default Profiles
The default templates are read-only reference configurations shown under the Default Profiles header at the top of the tab. They are grouped by render pipeline — URP, HDRP, and Built-in RP — each in its own collapsible foldout. Each template has a Preview button that opens a read-only inspector window so you can inspect the full settings, and a Copy button that duplicates the template into your own templates folder as a fully editable copy.
My Profiles
Templates you create or import are listed here. Click the template name to open an inline editor showing its modules and rules.
| Button | What it does |
|---|---|
| New Blank | Creates an empty template in your configured templates folder. |
| Copy Default | Dropdown listing all nine default templates. Select one to create an editable copy. |
| Import JSON | Loads a previously exported .json template file. All modules and rules are recreated as sub-assets. |
| From Presets | Opens the Preset Import window — scans the project for Unity .preset files and builds catch-all rules from them. |
| Edit | Expands the inline editor for this template. |
| Export JSON | Saves the template as a .json file you can share between projects or team members. |
| Delete | Permanently deletes this template from the project. Cannot be undone. |
Importing from Unity Presets
Unity’s built-in Preset system lets you save importer settings as .preset assets. If your project already has presets configured, Import Suite can convert them into template rules automatically.
Click From Presets on the Profiles tab to open the Preset Import window. All .preset assets in the project are listed, grouped by importer type (TextureImporter and AudioImporter are supported). Select the presets you want, choose whether to add them to an existing profile or create a new one, and click Import.
Note — all imported rules are catch-alls. Rules created from presets have no match criteria set — they will match every asset of that type. Open the template editor after importing and add suffixes, prefixes, or folder paths to each rule to narrow its scope.
Template Structure
Each template contains one or more modules:
- TextureImporterModule — controls texture settings (format, compression, mips, etc.)
- MeshImporterModule — controls mesh settings (compression, index format, read/write, etc.)
- AudioImporterModule — controls audio settings (load type, compression format, quality, etc.)
- SpriteImporterModule — controls sprite-specific settings (pixels-per-unit, mesh type, etc.)
Each module has an Is Enabled checkbox to skip that type entirely, and a dedicated Catch-All Rule section that provides a fallback for assets that don’t match any named rule.
Naming Convention
Each profile has a Naming Convention dropdown. It sets the project-wide convention applied to every rule in that profile:
| Convention | What it means |
|---|---|
| Suffix (default) | Assets must end with the canonical suffix, e.g. Rock_D.png. |
| Prefix | Assets must start with the required prefix, e.g. T_Rock.png. |
| Prefix + Suffix | Assets must have both, e.g. T_Rock_D.png. |
All rules inherit this setting by default. To use a different style for one specific rule, enable the Override toggle that appears to the right of the Naming Style row inside that rule’s Match Rule criteria.
Rules Inside a Module
Each module holds a list of rules. A rule combines a set of match criteria with the import settings to apply when the criteria are met. Click the foldout arrow on any rule to expand and edit it. Use the Duplicate button on any rule header to create a copy of that rule immediately below it.
Rules are evaluated from top to bottom. The highest-scoring rule wins. If two rules tie, the first one in the list is used. If two rules share the same name, their foldout headers display Name (duplicate) so the conflict is visible at a glance.
Match Rule Editor
Each rule has a set of match criteria fields. The Naming Style row at the top of the criteria block shows (from profile) by default, meaning the rule inherits the profile’s Naming Convention setting. Enable the Override toggle to unlock the dropdown.
| Naming Style | What is checked | Compliance result |
|---|---|---|
| Suffix Required (default) | Suffix criteria only. Prefix fields are greyed out and ignored. | Correct when the filename ends with the canonical suffix. |
| Prefix Required | Prefix criteria only. Suffix fields are greyed out and ignored. | Correct when the filename starts with the canonical prefix (or alias). |
| Prefix And Suffix Required | Both prefix and suffix criteria are active. | Correct only when the filename has both. |
Greyed-out fields are truly ignored. When fields are greyed out (suffix for Prefix Required, prefix for Suffix Required), any text already in those fields has no effect on rule matching or compliance scoring.
Prefix “Also Accepts” Aliases
Like the suffix section, the prefix section supports alias entries via an Also Accepts row. Click the + button to add an alias prefix. Alias prefixes match the same rule as the canonical Required Prefix, but assets that match via an alias are shown as yellow (Alias Variant) in the Naming Compliance scan, with the canonical name shown in the tooltip.
Rename Tab
The Rename tab lets you batch-rename assets using up to eight composable operations, applied in this fixed order:
- Remove From Text
- Text Replace
- Add Prefix
- Add Suffix
- Remove Prefix
- Remove Suffix
- Format Text (capitalisation)
- Normalise Suffixes
Each operation has an Enabled toggle. The toggle is fully manual: having text in a field does not automatically enable it.
Scope
Choose either your current Project window selection (Process Selected Assets Only), or drag a folder or asset into the Target field. When a folder is set, an optional Include Subfolders toggle recurses into nested folders.
The Skip assets already matching the naming convention checkbox appears directly below the Target field. When on, assets whose filenames already satisfy the active profile’s suffix or prefix rules are excluded from both Preview Renames and Apply Now. Requires an active profile; has no effect if none is selected.
Preview and Apply
- Preview Renames — opens a window showing every asset that will be renamed, with the old name in red and the new name in green. Each row has a checkbox — untick any asset to exclude it. The window has an Auto-refresh toggle.
- Apply Now — performs the rename immediately without a preview. After completion, an Undo button appears below the result summary.
- Clear All — resets all operation fields and disables all operations. Scope settings are preserved.
Naming Compliance
The Scan for Naming Compliance button opens the Naming Compliance window, which audits every asset in scope against the active profile’s naming rules without renaming anything.
Format Text — Capitalisation Styles
| Style | Example output |
|---|---|
| PascalCase | T_RockWall_D |
| camelCase | T_rockWall_D |
| snake_case | T_rock_wall_D |
| Pascal_Case | T_Rock_Wall_D |
| UPPER_CASE | T_ROCK_WALL_D |
| lowercase | T_rockwall_D |
| UPPERCASE | T_ROCKWALL_D |
Note on prefix/suffix preservation. Format Text treats the segment before the first underscore as a prefix (
T_) and the segment after the last underscore as a suffix (_D). Only the middle section is reformatted.
Naming Compliance Window
Opened via Scan for Naming Compliance on the Rename tab, this window audits every asset in scope against the active profile’s naming rules. No files are renamed — it is entirely read-only unless you use the inline edit fields.
Status groups
| Group | Colour | What it means |
|---|---|---|
| Non-compliant | Red | The filename would be changed by the current rename operations — it does not match the expected canonical form. |
| Alias variant | Yellow | The filename matches via a recognised alias rather than the canonical form. Technically valid, but not the canonical form. |
| Unknown | Grey | The asset matched the catch-all rule but its suffix is not listed in any rule’s accepted suffixes. |
| Correct | Green | The filename already matches the configured naming convention. No action needed. |
Inline renaming
Every row has an editable text field showing the current filename (without extension). Edit the name directly and click Apply to rename the asset on disk immediately — the window rescans and reclassifies all entries automatically.
Auto-refresh
The window has an Auto-refresh toggle. When on, the scan automatically re-runs whenever assets are imported or the project changes.
Settings Tab
Auto-Apply on Import
When enabled, Import Suite runs automatically every time Unity imports an asset — including assets imported by package updates and third-party tools.
Caution. Leave Auto-Apply off until you are confident your template settings are correct. It affects every imported asset. Unlike manual Apply, Auto-Apply does not create an undo history entry — only the manual Apply and Rename tabs support Undo.
Options available when Auto-Apply is on:
- Template — which template is applied automatically.
- Show a message in the Unity Console — logs one line per processed asset.
- Skip assets that already have Import Suite settings applied — prevents settings being re-applied when an asset is reimported for an unrelated reason.
- New Assets Only — only process assets being imported for the very first time.
Folder-Specific Auto-Apply
You can assign a different template to specific folders so that assets in those folders are processed with specialised settings rather than the global template.
The Folder-Specific Auto-Apply section lists all folder rules. Each rule maps a folder (identified by its GUID) to a template path. When an asset is imported, Import Suite checks for a folder rule whose path is the longest prefix of the asset’s path — the most specific match wins.
- Click Add and drag a folder from the Project window to create a new rule.
- Use the template dropdown on each row to change the template assigned to that folder.
- Enable Fallback Rule to apply a separate template to assets that are inside the tracked folders but don’t match any folder-specific rule.
Example. Map
Assets/Characters/to a URP_High template andAssets/Environment/to a URP_General template. The global Auto-Apply template is used for everything else.
Exclusion List
Any asset or folder in the Exclusion List is skipped by Auto-Apply entirely, regardless of folder rules or template settings.
- Drag an asset or folder into the Add object field to exclude it.
- Assets are tracked by GUID, so exclusions survive moves and renames.
- Click Remove on any row to re-enable Auto-Apply for that item.
- Click Clean Missing to remove stale entries for assets that have been deleted from the project.
File Size Warnings
Set per-type file size thresholds (in MB) to catch source assets that are larger than expected. In the Apply Import Settings window, any row whose on-disk size exceeds its threshold is tinted with an orange overlay.
- Textures / Sprites (MB) — applies to all texture and sprite assets.
- Audio (MB) — applies to audio clip assets.
- Meshes (MB) — applies to mesh and model assets.
Set any threshold to 0 to disable size warnings for that type. These thresholds are project-level settings (stored in ImportSuiteProjectSettings.asset) so the same values apply to every team member once the file is committed to version control.
General Preferences
- Default Folder for Import Suite Templates — where new templates are saved.
- Console Log Level — Silent, Warnings and Errors Only (default), or Full Verbose.
- Large Batch Confirmation Threshold — Import Suite asks for confirmation before processing more than this many assets. Default: 500. Set to 0 to disable.
Project Settings
Import Suite uses a two-tier settings system to separate configuration that should be the same for everyone on a team from personal preferences that belong on a single machine.
Project-level settings — commit to version control
Stored at Assets/itsMakingThings/ImportSuite/ImportSuiteProjectSettings.asset. Add it to version control so every team member shares the same configuration.
The following settings are project-level:
- Auto-Apply enabled, template path, log to console, skip already-applied, new assets only.
- Folder-specific Auto-Apply rules.
- Exclusion list (assets and folders).
- Default templates folder.
- Batch confirmation threshold.
- Console log level.
- File size warnings (Textures / Sprites, Audio, Meshes — in MB).
Per-user settings — stay in EditorPrefs
The following are personal preferences that stay on each individual’s machine:
- Active tab (which tab was open when you last closed the tool).
- Apply tab — target folder, include subfolders, process selected only.
- Apply tab — last selected template in the dropdown.
- All Rename tab field values, enabled states, and foldout states.
- Auto-Apply processed-path cache.
Onboarding a new team member. Because all the meaningful configuration lives in the project settings asset, a new team member gets the correct Import Suite setup as soon as they open the project — no manual configuration required.
Undo History
Import Suite records every manual Apply Import Settings and Apply Now (Rename) batch to disk so you can reverse the operation with one click. An Undo button appears in the result area of each tab immediately after the batch completes.
How it works
- Apply undo — before the batch runs, the raw
.metafile content of every candidate asset is read from disk. After the batch completes, a history file is written containing the old.metacontent for only the assets that were actually modified. Clicking Undo writes that content back to disk and callsAssetDatabase.Refresh(). - Rename undo — the old and new filename for every successfully renamed asset is recorded. Clicking Undo calls
AssetDatabase.RenameAssetin reverse for each entry.
Storage and limits
History files are written to Library/ImportSuiteHistory/. This folder is gitignored and per-machine. Up to 10 entries are kept; the oldest is pruned automatically. Each tab tracks its own last operation independently. Only one level of undo is available per tab.
Limitations
- Auto-Apply does not participate. The background postprocessor does not write history entries.
- Moved or deleted assets are skipped. If an asset is moved or deleted after the operation but before Undo is clicked, the undo for that asset is skipped with a warning in the Console. All other assets in the batch are still restored.
- Clearing
Library/removes history. Unity sometimes clears the Library folder to force a full reimport. When that happens, undo history is gone.
Best practice — version control. Committing your
.metafiles to Git (or another VCS) gives you unlimited, multi-level undo for any batch operation viagit checkout -- Assets/. Import Suite’s built-in undo is a convenience for quick reversals.
How Matching Works
When Import Suite processes an asset, it asks each enabled module: “Which of your rules best matches this file?” The module scores each rule against the asset path and picks the winner.
Scoring
Each rule starts at score 0. Every match criterion that is set and matches adds +1 to the score. Any criterion that is set and does not match immediately disqualifies the rule (score = −1). A rule with no criteria at all scores exactly 0 and matches any asset — this is the catch-all pattern.
| Criterion | What it checks |
|---|---|
| File Extension | One or more extensions (e.g. .png, .tga). The asset must match at least one. |
| Required Prefix / Also Accepts | The filename must start with the canonical prefix or one of its aliases. Only evaluated when Naming Style is Prefix Required or Prefix & Suffix Required. |
| Accepted Suffixes | The last _-delimited segment of the filename (e.g. _N in Rock_N.png). Only evaluated when Naming Style is Suffix Required or Prefix & Suffix Required. |
| Name Contains | A substring that must appear anywhere in the filename (case-insensitive). |
| Folder Path | The asset must be inside this folder. Enable Include Subfolders on the rule to match nested folders too. |
Naming Style gates matching. The Naming Style dropdown on each rule controls which criteria are actually evaluated during matching — not just which fields are greyed out in the UI. Fields that are greyed out are completely ignored at runtime, even if they contain text from a previous configuration.
Tie-breaking
When two rules have the same score, the rule that appears earlier in the list wins. Arrange your rules from most specific to least specific.
Multiple accepted suffixes and prefix aliases
A single rule can accept many suffix aliases. For example, a Normal Map rule might list _N, _Normal, _NRM, and _NormalMap — any file ending in one of those strings gets the same Normal Map settings. Similarly, a Static Mesh rule can list SM_ as canonical and S_ as a prefix alias.
Catch-All Rules
Each module can have a dedicated Catch-All Rule that matches any asset of that type when no explicit named rule wins. It acts as a safe default for files that don’t have a recognised suffix, prefix, or other match criteria.
The amber Catch-All section
In the template inspector, the catch-all rule is shown as a distinct amber-tinted section at the top of each module editor — visually separate from the named rules list below it. It has its own Enable Catch-All checkbox; by default it is disabled for new modules so it cannot accidentally process assets you haven’t explicitly configured.
Catch-all is powerful — use deliberately. When enabled, the catch-all rule processes every asset of that module’s type that doesn’t match a named rule. In a folder that mixes many asset types this can be unexpectedly broad.
Texture catch-all — Override Texture Type
The texture module’s catch-all rule has an Override Texture Type toggle that is off by default. When off, the catch-all will not change the texture type (Default, Normal Map, Sprite, Cookie, etc.) already set on the asset — it only applies the other settings defined in the rule such as compression format, max size, sRGB, and mip maps.
This prevents the catch-all from inadvertently converting 2D Sprites, UI textures, Normal Maps, or Cookies to Default type when they happen not to match any named rule. Named rules default to Override Texture Type on so they always set the type you configured.
Mesh catch-all — Apply Global Scale
The mesh module’s catch-all rule has an Apply Global Scale toggle that is off by default. When off, the catch-all leaves the Scale Factor on each asset unchanged. This prevents the catch-all from applying a single uniform scale to meshes from different artists who may have delivered them at different scales.
When to enable the catch-all
- You have a folder of assets that share the same import settings regardless of naming, and you don’t want to add a suffix rule for each one.
- You are applying a template to a mixed folder and want a safe fallback for any assets that don’t match a specific rule.
When catch-all is disabled, assets that match no named rule are reported in the Unprocessed Assets window rather than being silently processed with a fallback. This is the recommended setting when your team has a strict naming convention.
Unprocessed Assets Window
The Unprocessed Assets window opens automatically (via the button on the Apply tab) after a run that skipped assets because no template rule matched them.
This window lists each skipped asset with:
- The filename and extension
- The folder path
- A Select button that highlights the asset in the Project window and pings it
- A Rename to field and Rename button for inline renaming without leaving Import Suite
GUID-based source of truth
The window tracks assets by their Unity GUID, not by path. If you rename an asset in the Project window, the window detects the change on the next project update and refreshes the path automatically.
Typical workflow. Run Apply → open the Unprocessed Assets window → rename files to add the correct suffix (
_N,_ORM, etc.) → run Apply again. The files now match a rule and receive the correct settings.
Default Templates
Default templates are generated via Tools › itsMakingThings › Import Suite › Regenerate Default Profiles and saved as read-only assets under ImportSuite/DefaultProfiles/. The bundled set covers the most common pipeline and quality combinations:
| Pipeline | Quality | Desktop (BC7) | Mobile (ASTC) |
|---|---|---|---|
| URP | High | max 4096 px | ASTC 4×4, max 2048 px |
| URP | General | max 2048 px | ASTC 6×6, max 1024 px |
| URP | Low | max 1024 px | ASTC 8×8, max 512 px |
| HDRP | High | max 4096 px | ASTC 4×4, max 2048 px |
| HDRP | General | max 2048 px | ASTC 6×6, max 1024 px |
| HDRP | Low | max 1024 px | ASTC 8×8, max 512 px |
| Built-in RP | High | max 4096 px | ASTC 4×4, max 2048 px |
| Built-in RP | General | max 2048 px | ASTC 6×6, max 1024 px |
| Built-in RP | Low | max 1024 px | ASTC 8×8, max 512 px |
Each template includes platform overrides for desktop (BC7) and mobile (ASTC) within a single template — you don’t need separate templates per platform. Every template contains rules for 13 texture types, 3 sprite types, 3 mesh types, and 3 audio types.
To customise a default template, click Copy on the Profiles tab. An editable duplicate is created in your templates folder.
Understanding Default Profiles
The nine default templates are not arbitrary starting points — each format and size limit was chosen with a specific platform constraint or visual quality trade-off in mind.
The Three Quality Tiers
Every pipeline (URP, HDRP, Built-in RP) ships in three quality tiers. The tier controls both the maximum texture resolution allowed on each platform and the ASTC block size used on mobile. Everything else — compression algorithm family, channel assignments, sRGB flag — stays the same across tiers.
| Tier | Standalone max | Android / iOS max | WebGL max | Mobile ASTC block | Mobile BPP |
|---|---|---|---|---|---|
| High | 4096 px | 2048 px | 2048 px | 4×4 | 8.0 |
| General | 2048 px | 1024 px | 1024 px | 6×6 | 3.56 |
| Low | 1024 px | 512 px | 512 px | 8×8 | 2.0 |
The Desktop format column is always BC7 (or BC4/BC5 for single- and dual-channel maps) regardless of tier. The size cap is the main lever on desktop. On mobile, both the ASTC block size and the size cap change together, so a tier change has a compounded effect on GPU memory.
Desktop Compression — BC Formats
BC (Block Compression) formats are the DX10-era standard supported natively by all current PC GPUs. The GPU stores the texture in compressed form in VRAM — it never needs to be decompressed to a full-colour buffer at rest. Each format divides the texture into 4×4 pixel blocks, storing 128 bits per block.
| Format | Channels | BPP | Best for | Notes |
|---|---|---|---|---|
BC4 | 1 (R) | 4 | Roughness, Metallic, AO, Height | Stores a single greyscale channel with high precision. Half the memory of BC7 for textures that only ever use one channel. |
BC5 | 2 (RG) | 8 | Normal maps | Stores two independent BC4 channels (R and G). Unity reconstructs the blue channel in the shader as sqrt(1 - r² - g²). Highest-quality option for normal maps on desktop. |
BC7 | 4 (RGBA) | 8 | Albedo, Emissive, Packed maps, Metallic Smoothness, anything with alpha | Modern general-purpose format. Same bit budget as DXT5 (BC3) but with substantially better quality. |
Why not DXT1 / DXT5? DXT1 (BC1) and DXT5 (BC3) are older formats from DirectX 6 era hardware. BC7 encodes the same 4×4 blocks but uses its bits more intelligently — it can choose between multiple sub-modes per block to minimise error. The default templates use BC7 everywhere a four-channel format is needed and BC4/BC5 where fewer channels allow it.
BC6H for HDR emissive. BC6H stores three 16-bit float channels (RGB, no alpha) and is designed for HDR textures. If your project uses very high-range emissive maps, you can switch the Emissive rule’s desktop format from BC7 to BC6H.
Mobile Compression — ASTC
ASTC (Adaptive Scalable Texture Compression) is an ARM-developed format supported on all modern mobile GPUs. Unlike the BC family, which uses a fixed 4×4 pixel block, ASTC lets you choose the block size — larger blocks compress more aggressively at the cost of quality.
Every ASTC block stores exactly 128 bits regardless of size. The bits-per-pixel (BPP) therefore decreases as the block covers more pixels:
| Block | BPP | Relative to RGBA32 | Use when… |
|---|---|---|---|
ASTC 4×4 | 8.0 | ~4× smaller | Maximum quality — characters, hero assets, cutscenes |
ASTC 5×5 | 5.12 | ~6× smaller | High quality — primary environment textures |
ASTC 6×6 | 3.56 | ~9× smaller | Balanced — good default for most projects |
ASTC 8×8 | 2.0 | ~16× smaller | Performance mode — background elements, older devices |
ASTC 10×10 | 1.28 | ~25× smaller | Aggressive — tiling textures, distant terrain |
ASTC 12×12 | 0.89 | ~36× smaller | Minimum quality — UI backgrounds, thumbnails |
The default templates map the three quality tiers to ASTC 4×4, 6×6, and 8×8.
Device compatibility
- Android — all devices running OpenGL ES 3.1 or Vulkan (released 2014 or later). The default templates target this as the minimum baseline.
- iOS — all devices with an A8 chip or later (iPhone 6, iPad Air 2, released 2014). All currently App-Store-eligible devices support ASTC.
WebGL Compression — ETC2
WebGL 2.0 guarantees ETC2 support in its core specification — no extension needed. DXT/S3TC is not guaranteed on mobile browsers, so the default templates use ETC2 for WebGL to ensure the build works everywhere.
| Format | BPP | Alpha? | Best for |
|---|---|---|---|
ETC2_RGBA8 | 8 | Yes | Albedo, normal maps, emissive, packed maps, anything needing alpha or full colour |
ETC2_RGB4 | 4 | No | Roughness, metallic, AO, height — opaque single-channel maps |
The choice between ETC2_RGBA8 and ETC2_RGB4 for WebGL mirrors the BC7 vs BC4 split on desktop: single-channel maps drop to the 4 bpp opaque format, saving 50% of GPU memory at no quality cost.
Per-Type Format Rationale
The table below shows the format chosen for each texture type and explains why. “Mobile” refers to the canonical ASTC block for the tier; the block size changes between High / General / Low but the logic for choosing ASTC over another format stays the same.
| Texture type | Desktop | Mobile | WebGL | Rationale |
|---|---|---|---|---|
| Albedo / Base Color | BC7 | ASTC | ETC2_RGBA8 | Needs full RGBA. Alpha carries transparency or cutout. BC7 gives the highest colour fidelity of any 8 bpp four-channel format. |
| Normal Map | BC5 | ASTC | ETC2_RGBA8 | BC5 stores RG independently. Unity reconstructs B in the shader. Avoids the quality loss of swizzling normals into DXT5 channels. |
| Packed Map (ORM / MADS) | BC7 | ASTC | ETC2_RGBA8 | Three or four channels packed together. BC7 preserves each channel independently. Marked linear, no sRGB curve applied. |
| Metallic Smoothness | BC7 | ASTC | ETC2_RGBA8 | Two meaningful channels: R = metallic, A = smoothness. BC7 covers the RGBA block correctly. |
| Roughness / Metallic / AO / Height | BC4 | ASTC | ETC2_RGB4 | Single greyscale channel. BC4 is exactly 4 bpp — half the cost of BC7 with no wasted channels. |
| Emissive | BC7 | ASTC | ETC2_RGBA8 | Full RGB colour is needed. Alpha sometimes carries an emissive mask. sRGB is enabled. |
| VFX / Mask | BC7 | ASTC | ETC2_RGBA8 | Particle and effect textures need alpha for soft edges or dissolve masks. Marked linear. |
| Detail Normal Map | BC5 | ASTC | ETC2_RGBA8 | Same encoding as Normal Map but capped at a smaller max size. |
Render Pipeline Differences
The compression format choices are identical across URP, HDRP, and Built-in RP — the same physics of GPU formats applies regardless of which render pipeline you use. The differences between the three pipeline families are about naming conventions and packed-map channel layouts.
Packed map: URP and Built-in RP → _ORM
URP and the Built-in RP follow the ORM convention for packed channel maps:
- R — Occlusion (ambient occlusion)
- G — Roughness
- B — Metallic
Accepted suffixes: _ORM, _Packed, _MSK, _Mask.
Packed map: HDRP → _MADS
HDRP uses the MADS convention to match Unity’s HDRP Lit shader mask map input:
- R — Metallic
- G — Ambient Occlusion
- B — Detail mask
- A — Smoothness (not roughness)
Accepted suffixes: _MADS, _MaskMap, _Packed. If you are converting a URP project to HDRP, your ORM textures will need to be rebaked with the correct HDRP channel layout — renaming the suffix alone is not enough.
Suffix conventions: Albedo
URP and HDRP use the Base Color terminology (_BC, _BaseColor, _Albedo, _D, etc.). The Built-in RP profile additionally lists _Diffuse as an alias because the older Built-in shaders commonly used “Diffuse” to describe the albedo input. All three pipelines accept _A, _D, _Color, and _Col as aliases.
Audio quality per tier
The audio rules vary slightly by quality tier. Background music (BGM) uses a higher Vorbis quality setting in the High tier and a lower one in Low, reducing audio file size in the Low profile. SFX clips use ADPCM in all tiers (fast random access, good for short clips), so they are unaffected by the quality tier selection.
Choosing a Tier
Start with General
The General tier is the intended default for most projects. It targets a 1024 px mobile cap and ASTC 6×6 — a reasonable balance between visual quality and GPU memory pressure across a wide device range. Most mid-tier Android and all modern iOS devices handle this comfortably.
Upgrade to High when…
- The project targets modern high-end devices only (iPhone 15 Pro, flagship Android).
- You are building a premium title where texture quality is a selling point.
- You are making a VR application — low resolution per-eye magnifies compression artefacts significantly, and the High tier’s ASTC 4×4 is recommended.
- You have verified that your device-target GPU memory budget can sustain the larger textures.
Use Low when…
- The project targets low-end Android devices (2–3 GB RAM, older Mali/Adreno GPUs).
- You are building a casual or hyper-casual game where fast download size matters more than texture fidelity.
- The project is memory-constrained (e.g. a WebGL build where download size is a primary concern).
Mix tiers with folder-specific Auto-Apply
You are not restricted to a single tier for an entire project. Use Folder-Specific Auto-Apply to assign different templates to different folders — for example, apply the High template to Assets/Characters/ and the General template to Assets/Environment/. Hero assets that the player focuses on in close-up get premium quality; background elements stay budget-friendly.
Create a custom profile when…
- You need an ASTC block size not covered by a built-in tier (e.g. ASTC 5×5 or ASTC 10×10).
- Your project uses a non-standard naming convention (custom suffixes or prefixes).
- You have console targets (PS5, Xbox Series X) that need platform-specific format overrides.
- Your team uses a different packed-map convention (e.g.
_ARMinstead of_ORM).
Use Copy on an existing default template as the starting point rather than New Blank — it gives you a fully populated rule set that you can adjust incrementally.
Unity documentation. Unity’s manual covers the full list of supported formats per platform, including console-specific formats not addressed here.
Default Suffix Reference
The built-in texture rules recognise the following suffixes out of the box. You can add your own in the Templates tab. All texture rules require the T_ prefix in addition to one of the accepted suffixes (e.g. T_Rock_N.png, T_Wall_ORM.png).
| Rule name | Accepted suffixes | Texture type / settings |
|---|---|---|
| Normal Map | _N _Normal _NRM _NormalMap | Normal Map, linear, no sRGB, BC5 (Standalone), ASTC 4×4 (mobile) |
| Detail Normal Map | _DN _DetailNormal _DetailN | Normal Map, linear, smaller max size |
| Packed Map | URP / Built-in RP: _ORM · HDRP: _MADS | Linear, no sRGB, BC7 (desktop) / ASTC (mobile). Suffix differs by pipeline. |
| Metallic Smoothness | _MS _MetallicSmoothnessMap | Linear, two-channel (metallic in R, smoothness in A), BC7 / ASTC |
| Roughness / Smoothness | _R _Rough _Roughness _S _Smooth _Smoothness | Linear, single channel, BC4 (desktop) / ETC2 (WebGL) |
| Glossy | _G _Gloss _Glossy _Glossiness | Linear, single channel, BC4 / ETC2_RGB4 |
| Metallic | _M _Met _Metal _Metallic | Linear, single channel, BC4 / ETC2_RGB4 |
| Ambient Occlusion | _AO _Occ _Occlusion | Linear, single channel, BC4 / ETC2_RGB4 |
| Emissive | _E _EM _Emiss _Emissive _Emission | sRGB, BC7 / ASTC / ETC2_RGBA8 |
| Mask / VFX | _Mask _VFX _FX | Linear, alpha transparency on, BC7 / ASTC / ETC2_RGBA8 |
| Height / Displacement | _H _Height _Disp _Displacement | Linear, single channel, BC4 / ETC2_RGB4 |
| Base Color / Albedo | _D _Diff _Diffuse _A _Alb _Albedo _BC _BaseColor _Color _Col | sRGB, alpha transparency, mips enabled, BC7 / ASTC / ETC2_RGBA8 |
| Catch-All Rule | any texture with no recognised suffix (when catch-all is enabled) | Applies albedo-style settings as a fallback. Override Texture Type is off by default — existing texture types are preserved. |
The mesh module recognises SM_ (Static Mesh) and SK_ (Character / Rig) prefixes. The audio module recognises BGM_ (Music, streamed) and SFX_ (decompressed on load, ADPCM). Unmatched meshes and audio fall through to their respective module catch-all rules when enabled.
Tips & Troubleshooting
I want to check what will happen before reimporting
Click Apply Import Settings on the Apply tab to open the Apply Import Settings window. It runs the full matching logic against your scope and shows the result in groups — Will be applied, Compliant, No rule matched, Skipped — without touching any .meta files until you confirm.
I want to see exactly which fields would change, not just which assets
Open the Apply Import Settings window and hover the Status column on any ✗ Out of sync row. A floating popup shows every field that differs as Field / Current → Target. Settings compliance is reported per-row in this window.
Team members have different Auto-Apply settings
Check that ImportSuiteProjectSettings.asset is committed to version control and that everyone has pulled the latest version. The project settings asset is at Assets/itsMakingThings/ImportSuite/ImportSuiteProjectSettings.asset. Use the Locate button in the Settings tab to find and inspect it. Per-user settings (UI state, workflow fields) are in EditorPrefs and will differ between machines — that is expected.
Settings aren’t being applied
- Check that the module’s Is Enabled checkbox is on in the template.
- Check that the asset type is not unchecked in the Asset Type Filter on the Apply tab.
- Open the template in the Inspector and verify the rule’s match criteria. Use the Preview button on the Profiles tab to inspect a default template’s settings.
- Enable Full Verbose in Settings and run Apply again. Import Suite logs which rule matched (or didn’t match) each asset.
The wrong rule is being applied
The highest-scoring rule wins. If an unexpected rule is winning, it likely has more matching criteria than the rule you expected. Check the order of your rules — move the more specific rule above the less specific one, or add extra criteria to the correct rule to raise its score.
Assets are showing up as unprocessed
The asset’s filename does not match any named rule in the module, and the module’s Catch-All Rule is disabled. Either:
- Rename the asset to include a recognised suffix (use the Rename tab or the inline rename in the Unprocessed Assets window).
- Add the file’s existing suffix to the relevant rule in the template.
- Enable the Catch-All Rule in the amber section at the top of the module editor if you want a default fallback.
I want to reverse an Apply or Rename batch
Immediately after a batch completes, an Undo button appears in the result area of the Apply or Rename tab. Click it to reverse the operation. If you have already closed or switched away from the tab, the undo button is gone — use version control (git checkout on your .meta files) to restore the previous state instead.
The Rename tab won’t disable an operation
Each Rename operation has an Enabled toggle that is fully manual. Click it to disable, regardless of what is in the text field.
Auto-Apply is running on assets I don’t want it to touch
Auto-Apply runs on every imported asset, including those inside package folders. Use the Folder Path criterion on your rules to restrict them to specific directories, or turn off Auto-Apply and use the Apply tab manually.
Performance — large asset libraries
- Use the Large Batch Confirmation Threshold in Settings as a safety net.
- Scope your Apply runs to the smallest folder that contains the assets you actually want to process.
- The Unprocessed Assets window resolves paths on
projectChangedonly, so it does not poll continuously and has no per-frame cost when idle.